 |
|
More Related Stories |
 |

From: $339 to $876  |
|
Macromedia Flash Professio... - - complete package
Flash Professional is the industry's most ...
From: $339 to $630 |
|
Adobe Academic Flash Professio... 8.0 for Mac or Windows
Academic (ACD) Flash Professional 8.0 for Mac or W...
From: $231 to $250 |
| Page (1) of 2 - 05/24/06 |
|
In previous versions of Flash, motion tweening was a difficult and time-consuming way to give animations realistic motion effects. The Ease In/Ease Out feature was helpful but its limitations became apparent when you applied it to complex animations because you had to create a lot of frame-by-frame shape and motion tweening to mimic something that looked natural.
Flash Professional 8 enhances easing with Custom Ease In/Ease Out. This new feature provides you with a graph that gives you much more control over tweening. Using the velocity curve provided, you can control motion tweening precisely and at specific frames. In addition, the Custom Ease In/Ease Out feature gives you the option of applying a custom velocity curve for each symbol property independently.
This improved easing feature in Flash Professional 8 can yield amazing motion tweening effects that are easy to create and fun to play with. This article will help you understand the Ease In/Ease Out graph by showing you specific examples that create interesting animation effects. I also discuss custom easing properties and applying multiple easing effects.
Requirements
To complete this tutorial, install the following software and files:
Flash Professional 8
Try
Buy
Sample files:
custom_easing.zip (ZIP, 50K)
Prerequisite Knowledge
Basic knowledge of Flash and a practical knowledge of easing and motion tweening in Flash.
Custom Easing in Flash
Flash offers you a few methods for controlling the easing of your animation. The first uses the Ease slider in the Property inspector. This is how you did it in previous versions of Flash. The second method uses the Custom Ease In/Ease Out dialog box, which is available only for motion tweening animation.
(The third way involves ActionScript , whether you use the Tween class/easing methods or your own equations.)
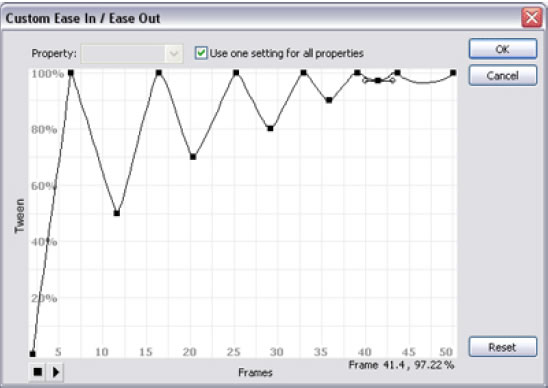
When you click the Edit button next to the Ease slider (you must first click a frame on the Timeline that contains a motion tween), the Custom Ease In/Ease Out dialog box appears with a graph that provides independent control over the symbol properties such as the position, rotation, scale, color, and filters, all of which change during the motion tweening. Note: When you apply custom easing on your symbol, the Ease value in the Property inspector displays --.
The Custom Ease In/Ease Out dialog box includes the following features:
- The Ease In/Ease Out graph lets you control the easing of your tweening by editing the curve through the control points, as I discuss in the next section.
- The Use One Setting for All Properties option uses one curve setting for all object properties (selected by default).
- The Property pop-up menu becomes active when you deselect the Use One Setting for All Properties option; it allows you to specify a separate
curve setting for each of the position, rotation, scale, color, and filters properties of the symbol. - The Play and Stop buttons let you preview the curve effect on your animation.
- The Reset button reverts the velocity curve to its default position.
This article concentrates on the Ease In/Ease Out graph, which is the powerhouse behind the easing feature in Flash 8.
Understanding the Ease In/Ease Out Graph
The Ease In/Ease Out graph is easy to use. The horizontal axis represents the frames of the movie and the vertical axis represents the percentage of change in animation (tweening). You control the animation using the control points on the velocity curve. You can add points by clicking on the curve or delete points by selecting the point and pressing the Delete key.
Each control point has two handles, called tangent points. By moving these tangent points, you can control the manner of the velocity curve (see Figure 1). This affects the smoothness of the resulting tweening animation.
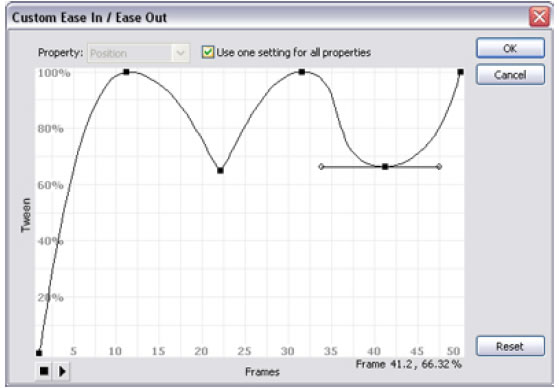 |
| Figure 1. Custom Ease In/Ease Out graph |
Let's break down the different parts of the graph to see better how it works. The speed of the tweening is affected by the slope of the velocity curve. The vertical parts of the curve with a large slope represent a fast animation, while the horizontal parts with a small slope represent a slow animation. In Figure 2 the velocity curve starts with a large slope value, moves horizontally, and ends with a large slope again in the end of the animation.
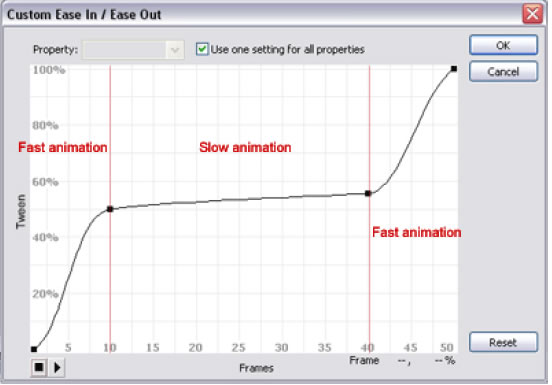 |
| Figure 2. Effect of the velocity curve slope on the animation |
Play the following demo to see the effect of the velocity curve slope in Figure 2 on the animation:
As I mentioned, the tangent points affect the slopes in the velocity curve. Steep curves produce a sharp, fast animation that is suitable for mimicking a collision, such as metal balls hitting each other. I will get to this example later.
Wide curves produce a smooth animation that is suitable for creating slow movements. In Figure 3, the first collision with the opposite border is a sharp animation point, which indicates a fast trajectory of the animated star, while the wide part of the velocity curve produces a slow return of the star to the middle of the Stage.
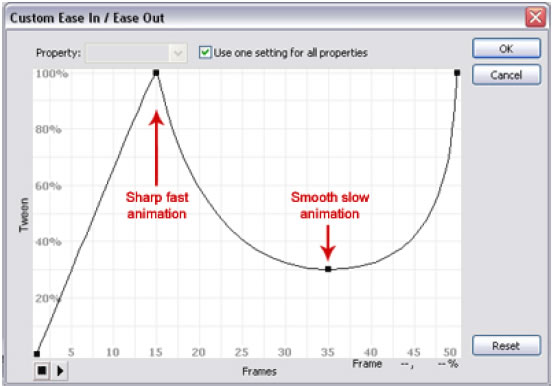 |
| Figure 3. Tangent points in the velocity graph |
Play the following demo to see the effect of the tangent points shown in Figure 3 on the animation:
In this example, the points location on the graph indicates the tweening percentage. When putting a low value point after a high value one, this means that the tweening will retreat back to a lower percentage. In Figure 3, the lower point indicates that the motion tweening will retreat to 30% of the tweening after reaching its final effect (100% percent).
Using the Easing Graph to Create Animation Effects
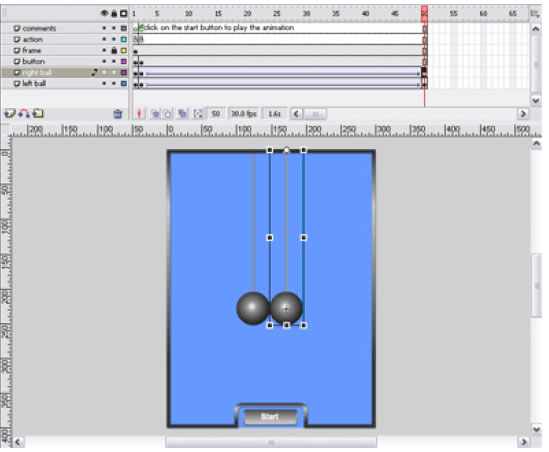
The following example mimics the collision of two metal balls. In previous versions of Flash, you had to go through a lot of motion tweening and keyframes to get the result you wanted. But as you will see, you will accomplish the effect with only one motion tweening for each symbol (the metal ball).
To create the effect in the example, follow the steps below:
1. Create a metal ball symbol as shown in the MetalBall.fla example and put it on the Stage.
2. Duplicate the metal ball symbol instance and put each one on a different layer.
3. In the first keyframe of the animation, position the metal ball symbols as shown in Figure 4. The transformation point is as shown.
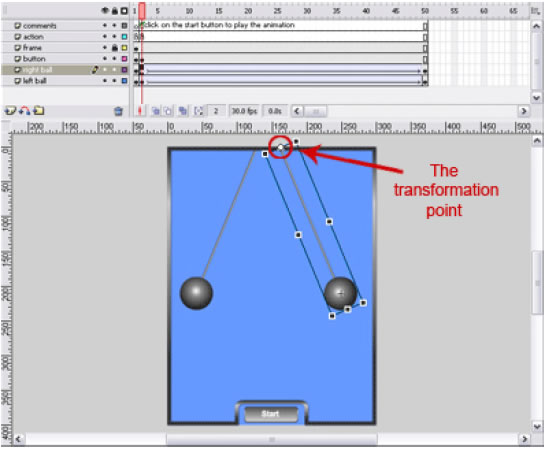 |
| Figure 4. Symbol positions in the first animation keyframe |
4. In frame 50, create another keyframe and position the metal ball symbols, as shown in Figure 5.
 |
| Figure 5. Symbol positions in frame 50 |
5. Create a motion tween for both symbols and select any frame within it.
6. In the Property inspector, click the Edit button next to the Ease slider.
7. In the Custom Ease In/Ease Out dialog box, edit the velocity curve so that it resembles the graph you see in Figure 6.
8. Preview your animation by clicking the Play button in the dialog box. It should appear as it does in the following animation.
 |
| Figure 6. Editing the velocity curve |
Play the following demo to see the sample motion tweening animation that uses a Custom Ease In/Ease Out setting:
Related Newsletter: DMN Newsletter , CMN Newsletter , Pixels Newsletter , Mac Alert Newsletter , Digital Media Net , DMNForums , Tutorial Finder
To Comment on This Article, Click HERE
Most Recent Reader Comments:
Click Here To Read All Posts
Must be Registered to Respond (Free Registration!!!, CLICK HERE)
Digital favorites
- Casino Online Non Aams
- Betting Sites UK
- Casino UK Sites
- Casino Online Non Aams
- Casino Non Aams
- Casinos Not On Gamstop
- UK Online Casinos Not On Gamstop
- Meilleur Casino En Ligne
- Crypto Casinos
- Casino Online Italia
- Migliori Giochi Casino Online
- Meilleur Casino En Ligne Français
- Casino En Ligne
- Meilleur Casino En Ligne Francais
- Siti Scommesse Non Aams
- Siti Poker Online Migliori
- Meilleur Site De Poker
- Site De Paris Sportif Nouveau
- Sweet Bonanza Fruits Avis
- Parier Sur Ufc
- Fm카지노 가입코드
- 비트코인 스포츠베팅
- Casino Jeux En Ligne
- Sites De Paris Sportifs
- Casino En Ligne Argent Réel
- Cresus Casino Avis
- Migliore Casino Non Aams
- Meilleur Casino En Ligne
- Meilleur Casino En Ligne 2026
- Casino En Ligne Fiable
- Casino En Ligne
- Migliori Casino Crypto
- Bonus Free Spin Senza Deposito
- Casino Online Non Aams Sicuri
- Migliori Siti Scommesse Non Aams
- Meilleur Casino En Ligne De France
- Casino En Ligne
- Casino En Ligne Fiable
- Trusted Online Casino Malaysia
- Nouveau Casino En Ligne 2026
- オンラインポーカー
- Casino En Ligne Cashlib


 (Rated by 45 users)


