 |
|
More Related Stories |
| Page (1) of 1 - 09/01/06 |
|
Previously we looked at using Distribute commands to create even rows and columns of objects spanning the entire length and width of the document. (You can read that article by clicking here.) That's handy for some purposes. But most of the time you don't want to span the entire document, and you want more control over the number of objects, the spacing of the objects and the rotation of the objects.
So this time around, we'll look at the use of a live effect applied to a single object (or group of objects) to spread those objects out across and down a page, as well as adding in rotation and even creating a spiral pattern effect. This method will be based on a single group of objects, and we'll spawn multiple instaces of that object to create the effect, which will look like this.

Or this.
Or even this.
Spreading out horizontally
The basic principle of this technique is spawning multiple instances of an object and spreading those instances across the page. And it's all done with a single effect: Transform. Not your standard Transform command, mind you, but the live effect known as Transform.
We'll get started by creating a row of objects horizontally across the canvas.
Start with a single object or group of objects. I'm using some of Illustrator's stock symbols grouped together to form a sort of bouquet.
With this group selected, I'll choose Effect > Distort & Transform > Transform. In the dialog that pops up, I'll set the object to Move horizontally 70 points.
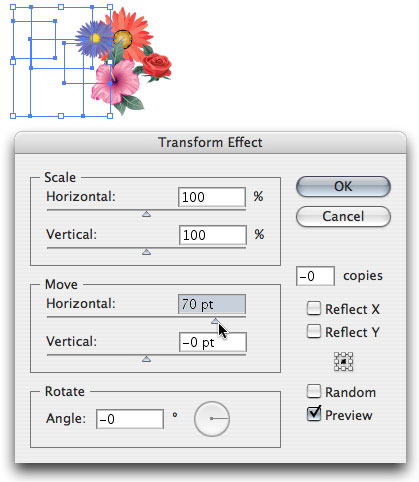
And I'll set the number of copies to 5.
Of course, you'll set these values to whatever happens to suit the artwork you're working with. You can make the objects overlap more by shortening the horizontal spread, or you can set the farther apart by widening it. Note that while the slider goes to a maximum of 100 points, you can manually type in any value up to about 4,000 points. To spread your object from right to left, rather than left to right, enter a negative value. (Changing the direction will affect the stacking order of the objects.)
Spreading out vertically
Now, in order to spread these objects out vertically, we're going to have to apply a second Transform effect to the object. Otherwise, if we simply typed in both a horizontal and vertical value, we'd wind up with a diagonal distribution, like this.
But by adding the effect a second time, we can actually maintain the horizontal distribution and spread that entire row down the page.
So, once again, choose Effect > Distort & Transform > Transform. You will see a dialog box warning you that you're applying the effect twice. Click the button labeled "Apply New Effect" to continue.
And in the new dialog that pops up, enter a vertical Move value of -70, and set the number of copies to 5.
Now you have your objects distributed evenly on your page within a limited area, as opposed to using Distribute commands, which would spread them out entirely across the page.
Once again, use whatever values work best with your objects. I used a negative vertical Move value to distribute the objects down from my starting object. A positive value will distribute them upwards from their starting point.
Creating a spiral or wreath effect
If you wish, you can also add in some rotation to your objects to create spirals, wreaths and other geometric effects. You can do this simply by adding in a rotation value to each of your Transform effects.
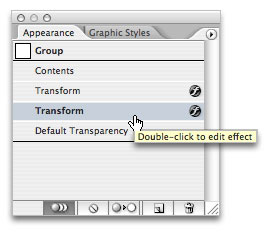
To access the effects you've applied, open up the Appearance palette (Window > Appearance), and double-click the bottom Transform effect listed with your object.
In the dialog, type in a Rotate value of -45. Depending on the size of your original object, the number of copies and the spread of the copies, you should wind up with something like this.
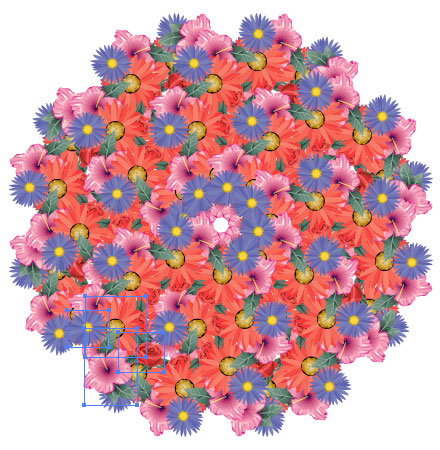
Then double-click the top Transform effect in the Appearance palette, and type in a Rotate value of -30. This will give you something approximating a wreath.
Adding independent rotation to the objects
Using the method above, you've added rotation to the rows and columns of your spawned object as a whole. However, you may wish to add in rotation of the individual objects so that the distribution doesn't appear so uniform. You can do this with any pattern of objects that you've created, whether evenly distributed rows and columns or spirals,wreaths or other shapes. I'll work with the wreath shape I just created.
To do this, you're going to need to expand the appearance of your object, whether you're starting with a wreath or spiral or a set of fixed rows and columns. To to this, choose Object > Expand Appearance.
This will convert your spawned copies into individual objects.
When this happens, the spawned objects are automatically placed into a group. Now, to introduce random rotation to these objects, you'll need to ungroup them twice--once for each Transform effect you've applied.
So choose Object > Ungroup twice (or use whatever keyboard shortcut you have set for this command, usually Shift-Command-G).
Now, once again, choose Effect > Distort & Transform > Transform. This time, type in a Rotate value of 360. DO NOT spawn additional copies of the objects. And make sure you click the "Random" checkbox.
Here's the result on our wreath.
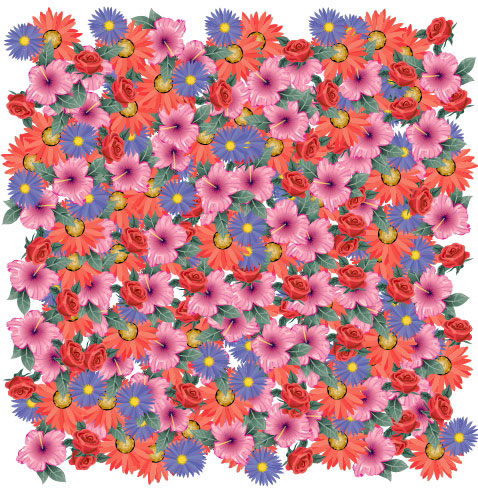
And you've seen the result on the evenly distributed objects up at the beginning of this article.
That's it for the lesson in object distribution with the Transform effect. If you have ay questions about Illustrator, be sure to visit me in the Adobe Illustrator forum at DMN Forums by clicking here.
 If you liked this article
click here to recommend it.
Page: 1
If you liked this article
click here to recommend it.
Page: 1
Related Sites: Creative Mac , Digital Producer , Audio Video Producer , Corporate Media News , Digital Media Designer , Oceania , MacDesignPro
Related Newsletter: DMN Newsletter , Pixels Newsletter , Mac Alert Newsletter , Digital Media Net , DMNForums , Tutorial Finder
To Comment on This Article, Click HERE
Most Recent Reader Comments:
Click Here To Read All Posts
Must be Registered to Respond (Free Registration!!!, CLICK HERE)
Digital favorites
- Casino Online Non Aams
- Betting Sites UK
- Casino UK Sites
- Casino Online Non Aams
- Casino Non Aams
- Casinos Not On Gamstop
- UK Online Casinos Not On Gamstop
- Meilleur Casino En Ligne
- Crypto Casinos
- Casino Online Italia
- Migliori Giochi Casino Online
- Meilleur Casino En Ligne Français
- Casino En Ligne
- Meilleur Casino En Ligne Francais
- Siti Scommesse Non Aams
- Siti Poker Online Migliori
- Meilleur Site De Poker
- Site De Paris Sportif Nouveau
- Sweet Bonanza Fruits Avis
- Parier Sur Ufc
- Fm카지노 가입코드
- 비트코인 스포츠베팅
- Casino Jeux En Ligne
- Sites De Paris Sportifs
- Casino En Ligne Argent Réel
- Cresus Casino Avis
- Migliore Casino Non Aams
- Meilleur Casino En Ligne
- Meilleur Casino En Ligne 2026
- Casino En Ligne Fiable
- Casino En Ligne
- Migliori Casino Crypto
- Bonus Free Spin Senza Deposito
- Casino Online Non Aams Sicuri
- Migliori Siti Scommesse Non Aams
- Meilleur Casino En Ligne De France
- Casino En Ligne
- Casino En Ligne Fiable
- Trusted Online Casino Malaysia
- Nouveau Casino En Ligne 2026
- オンラインポーカー
- Casino En Ligne Cashlib
Source:Digital Media Online.
All Rights Reserved


